
This is a project that I've been dieing to try after seeing the idea here. It is really simple and all you need is patience (to let the paint dry!)I used the clay terracotta potters for mine and scrapbooking paper.
What You'll Need: 3 Terracotta potters (about 6 inches in diameter); 3 terracotta saucers in varying sizes (I used 8", 11 3/4" and 12 1/2"); the 12"x12" scrapbooking paper, hot glue/hot glue gun, a pencil, scissors, acrylic paint of your desired color(s) and spongy brushes.
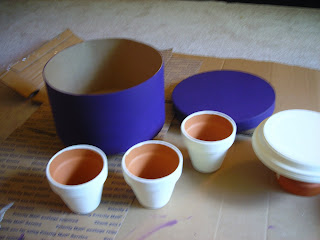
Step 1: Set up your work station and dust off your terracotta pieces (I found mine at home repair stores that were outside, but they were on sale because it was during the end of summer).
Step 2: Trace the bottom of your saucers on your paper. I learned this the hard way and waited after my paint was dry and ended up with pencil marks. You may have to cut your pieces a little smaller than what you traced but that's ok. I also learned that even if you can't cut a perfect it you can't notice because there will be other things to look at!
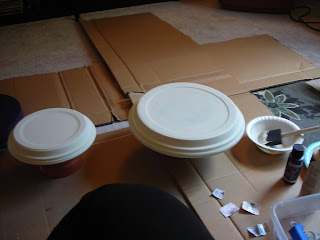
Step 3: Start to paint your pieces. I did the potters first because I wanted to get a feel for it. Remember that you do not need to paint the bottoms or insides of the potters. I used an up and down motion similar to painting a wall so I got smooth lines.
The middles of the saucers do not need to be painted either unless you are not going to use any paper for it. For this I went in a circle following the saucer for the first layer. You do not need to be fancy for the first layer as long as things are covered up.
Step 4: Be Patient! Let the paint dry before you add your second coat!
Step 5: Add your second coat of paint. This time do it in slower, nicer, smoother fashion than before. Make sure you don't have splotches or drips. Let dry.
You can also add any decorative ribbon around the edge of the saucers. I left mine plain so far because I really like the clean lines and the detail of the paper.
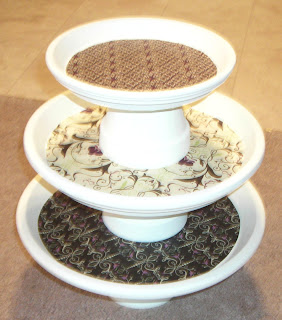
Here is my finished result:


What You'll Need: 3 Terracotta potters (about 6 inches in diameter); 3 terracotta saucers in varying sizes (I used 8", 11 3/4" and 12 1/2"); the 12"x12" scrapbooking paper, hot glue/hot glue gun, a pencil, scissors, acrylic paint of your desired color(s) and spongy brushes.
Step 1: Set up your work station and dust off your terracotta pieces (I found mine at home repair stores that were outside, but they were on sale because it was during the end of summer).
Step 2: Trace the bottom of your saucers on your paper. I learned this the hard way and waited after my paint was dry and ended up with pencil marks. You may have to cut your pieces a little smaller than what you traced but that's ok. I also learned that even if you can't cut a perfect it you can't notice because there will be other things to look at!
Step 3: Start to paint your pieces. I did the potters first because I wanted to get a feel for it. Remember that you do not need to paint the bottoms or insides of the potters. I used an up and down motion similar to painting a wall so I got smooth lines.

The middles of the saucers do not need to be painted either unless you are not going to use any paper for it. For this I went in a circle following the saucer for the first layer. You do not need to be fancy for the first layer as long as things are covered up.

Step 4: Be Patient! Let the paint dry before you add your second coat!
Step 5: Add your second coat of paint. This time do it in slower, nicer, smoother fashion than before. Make sure you don't have splotches or drips. Let dry.
*This would be a perfect time to heat up your hot glue gun and cut out your circles*
Step 6: Put your circles in each of the saucers to be sure that they fit. Use your hot glue gun to put a little dab in the circle.
*The reason for this is so you get the paper on there where you want it while the glue dries fast. Again I learned the hard way (twice!)...I used glue on the whole thing first and got too finicky with the paper so the glue was mostly hard by the time I got it on...and then I moved too quickly and the paper got caught before it was in the middle.*

Anyway, once you have the paper where you want it, go around adding glue and attaching your paper.

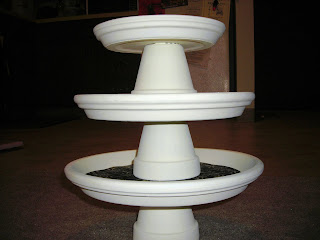
Step 7: Go ahead and assemble - if you like. Make sure you calculate where the center is for those potters. You could trace around the bottom if they look centered to you or you could get fancy with a ruler. You can use your hot glue gun to stick them together! I have to store mine for a while so I did not attach the pieces together, but I did stack them just to see how they would look:
*The reason for this is so you get the paper on there where you want it while the glue dries fast. Again I learned the hard way (twice!)...I used glue on the whole thing first and got too finicky with the paper so the glue was mostly hard by the time I got it on...and then I moved too quickly and the paper got caught before it was in the middle.*

Anyway, once you have the paper where you want it, go around adding glue and attaching your paper.

Step 7: Go ahead and assemble - if you like. Make sure you calculate where the center is for those potters. You could trace around the bottom if they look centered to you or you could get fancy with a ruler. You can use your hot glue gun to stick them together! I have to store mine for a while so I did not attach the pieces together, but I did stack them just to see how they would look:

Here is my finished result:


Love it! We are having cupcakes at our wedding!
Love it Jana - :)
Ooohh.. that's a great DIY idea! I like it!